 By Ethan Brooks
Updated November 2026
Images of fishing lures are one of the fastest ways to figure out which bait will work for your water, your target species and your budget. This guide shows you how to find useful lure photos, how to read what they actually tell you about a lure’s action and size, and how to turn a screen full of pictures into a short, sensible buying list.
Why Lure Images Matter More Than Product Titles
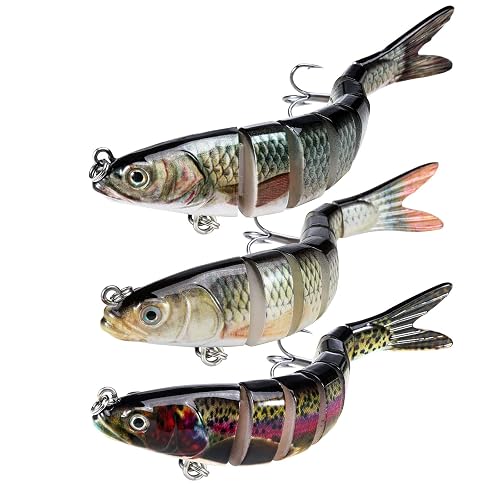
A product title usually tells you a brand and a model name, but it rarely tells you how a lure swims, how deep it runs or what color it really is. A good photo fills in those gaps. Side-on shots show body shape and profile, close-ups reveal paint finish and hook placement, and in-water shots (when available) show how light passes through the plastic or how a metal blade flashes. Learning to read these details is the difference between buying a lure that fits your fishing and buying one that just looks nice on a shelf.
Shopping for one? See our guide: 5 Best Bass Assassin Fishing Lures of 2026: Picks Compared.
Step 1: Know Exactly What You Are Looking For
Before you open a search, narrow down the question you want the pictures to answer. Vague searches return thousands of random results. Specific ones return useful ones.
- Target species: largemouth bass, trout, catfish, walleye and so on each respond to different profiles and colors.
- Lure type: crankbait, spoon, spinnerbait, soft plastic, topwater or jig.
- Water type: clear lake, stained river, weedy pond or fast stream.
- Depth zone: surface, shallow, mid-water or deep.
A search such as “suspending jerkbait images for clear bass lakes” will get you far more relevant results than “fishing lure pictures.”
Step 2: Find Reliable Sources for Lure Photos
Lure photos come from several places, and each source has a different strength:
- Manufacturer product pages: usually the most accurate for color names, sizes and included hardware. Manufacturers specify dimensions, weight and running depth in their listings.
- Tackle retailer sites: often include multiple angles and close-ups.
- Angler forums and photo-sharing communities: show real lures in real conditions, though lighting and editing vary widely.
- Marketplace listings: helpful for condition checks, especially on used or vintage items, but always compare against a manufacturer photo.
When you find a promising lure, search for the exact model name and check at least two sources. If the colors or proportions don’t match across photos, the lure may have had several production runs, or the image may be misleading.
Step 3: Read the Details in Each Photo
Once you have a set of images, look past the color and shine and check the following features.
Body Shape and Profile
Side-profile photos show whether a lure is slim and minnow-like or deep-bodied and wide. Slim profiles generally suit clear water and finesse presentations. Deep, wide bodies often produce more vibration and suit stained or murky water. Compare the lure’s length to the mouth size of your target fish. For bass, a lure around 3 to 4 inches is a common starting point, while panfish respond to much smaller baits.
Lip and Bill Design
For crankbaits, the lip determines the running depth. A large, wide lip digs deeper, while a small or flat lip keeps the bait higher in the water column. Look for a top-down or angled photo to see the lip clearly. Manufacturers usually list the target depth in the product specifications, so use the photo to confirm the lip shape matches that claim.
Hook Placement and Hardware
Check whether the lure comes with split rings, treble hooks or a weed guard. Close-up photos show the hook gap and the wire thickness. If a lure ships without hooks, the photo will show a bare hook eye, which means you need to add hardware before fishing.
Color and Finish
Color is the hardest thing to judge from a screen. Bright monitors and phone screens exaggerate saturation, and lighting in a studio can wash out subtle patterns. As a general guide, natural shad and baitfish patterns tend to work in clear water, while chartreuse and bright orange show up better in stained water. Metallic finishes flash in sunlight and often help in low light.
Step 4: Compare Images Side by Side
Pick three to five lures that meet your criteria and line up their photos. The table below shows a simple way to organize what you see. Fill in the blanks from the manufacturer listing and your own notes from the images.
| Feature to Check | What the Image Shows | Why It Matters |
|---|---|---|
| Body profile | Slim or deep, length relative to hook | Fits your water clarity and fish size |
| Lip size and angle | Wide, angled or flat | Controls running depth |
| Hardware included | Hooks, rings, weed guard | Determines how much extra gear you need |
| Color pattern | Natural, bright or metallic | Matches light and water conditions |
| Finish quality | Paint chips, sharp edges, clean eyes | Affects durability and action |
Step 5: Check the Photo Against Your Own Fishing
A lure photo is only useful if it fits how you fish. Before you commit, run through this quick checklist:
- Does the lure’s running depth match the depth where your fish usually hold?
- Is the body length close to the size of baitfish in your water?
- Does the color suit the clarity of your lake or river?
- Do you already own the rod, reel and line that suit this lure’s weight?
- Will you need to buy extra hooks, rings or clips before you can fish it?
If you answer “no” to two or more of these, keep looking.
Common Mistakes When Using Lure Images
- Trusting one photo: single shots can hide size, paint wear or missing hardware. Always check at least two angles.
- Ignoring scale: a lure that looks big in a close-up may be small in person. Look for photos that include a ruler, hand or known object.
- Buying on color alone: the pattern may look perfect on screen but read very differently under water.
- Confusing similar models: many brands release a deep-diving and shallow-running version of the same bait with near-identical photos. Check the model number and running depth.
- Overlooking used-item condition: vintage and secondhand lures often show paint loss or rust that only close-up photos reveal.
Tips for Getting the Most from Lure Photos
- Save images in a folder by species or lure type so you can compare later.
- Screenshot the manufacturer’s specification text alongside the photo.
- If you own a lure already, photograph it under daylight and in the same orientation as the listing. This builds your own reference library.
- Use the photos to plan rigging. Once you see the hook placement, you can decide whether to swap hooks for better sharpness or a different gap.
Recommended gear
A few supplies make it easier to check lure details and set up the baits you pick from photos.
- Split ring pliers: the photo shows the rings, but a good pair of pliers makes swapping hooks and clips quick and safe for your fingers.View on Amazon
- Replacement treble hooks: many lures ship with hooks that are fine for casual use but can be upgraded for sharpness and hook gap.View on Amazon
- Tackle box with clear dividers: clear compartments let you store lures you’ve identified in photos so you can find them quickly on the water.View on Amazon
For ideas on organizing what you buy, see Using Utility Boxes for Fishing Lure and Tackle Storage.
Where to Go Next
Once you have narrowed your photo search, a species-specific guide will help you choose the final bait. If you fish for bass, Top 7 Largemouth Bass Fishing Lures with Strong Value for Every Angler compares popular options side by side. Trout anglers may find Top 6 Trout Fishing Lures and Baits for Streams and Lakes useful, and catfish anglers can review Top 6 Fishing Lures for Catfish: Picks for Every Setup. For collectors, Vintage Fishing Lures in Box: 6 Best Picks for Collectors and Anglers covers how to judge older baits from their photos.
FAQ
Where can I find accurate images of fishing lures?
Manufacturer product pages are usually the most accurate, since they list exact dimensions, colors and included hardware. Tackle retailer sites and angler communities add real-world photos that show how lures look in use.
How can I tell the size of a lure from a photo?
Look for photos that include a ruler, a hand or a common object for scale. If none are available, compare the length listed in the manufacturer specifications to the image’s proportions.
Do colors look the same in photos and in the water?
Not exactly. Screens and lighting change how colors appear, and water filters light differently at each depth. Bright colors tend to show up better in stained water, while natural patterns often suit clear water.
How do I know how deep a crankbait will run?
Check the manufacturer’s listed running depth, then use the photo to confirm the lip size and angle. A larger, wider lip generally dives deeper.
Should I buy a lure based on one photo?
It’s better not to. Compare at least two angles and two sources to check body shape, hardware and color consistency before buying.
Are photos of used or vintage lures reliable?
They can be, but close-up photos are essential. Look for paint loss, rust on hooks, cracks in the body and wear on the eyes. Compare the listing against a known-good photo of the same model.
Can lure images help me rig my bait?
Yes. Hook placement, eye position and included hardware are all visible in good photos. They show you where the hooks sit and whether you need to swap in new rings or hooks before fishing.
Is it worth photographing my own lures?
Yes. Your own photos, taken in daylight and from the same angles as manufacturer listings, create a personal reference library. You can use them to identify lures in your tackle box and to track wear over time.
Conclusion
Images of fishing lures help you judge body shape, lip design, hardware and color before you spend money. Start with a specific question, check several reliable sources, and compare photos against your target species and water. A short checklist and a side-by-side comparison will turn a long list of pictures into a confident choice.
Related reading
Ready to choose one?
About Ethan Brooks
Ethan Brooks is part of our editorial team and reviews and edits our freshwater fishing tackle on a budget guides, checking product details against manufacturer specifications and owner feedback.