 By Ethan Brooks
Updated November 2026
Making your own diy fishing lures bass anglers can actually use is more straightforward than most people expect. In this guide you will learn how to pick a lure style that matches the fish you are targeting, gather the right materials, pour or tie a basic lure, finish it, and test it on the water. By the end, you will have a repeatable process for building jigs, soft plastics and topwater baits that hold up under real bass fishing conditions.
Why Make Your Own Bass Lures
Homemade lures give you control over size, weight, color and action that off-the-shelf baits rarely match. If bass in your lake are keying on a specific forage, such as small bluegill or shad, you can build a bait that mirrors it. Many hobbyists also find the process useful for experimenting with custom colors or weights that are hard to buy in stores. Homemade baits are also an easy way to stretch a tackle budget, since a single mold or bag of materials can produce dozens of lures.
Shopping for one? See our guide: 5 Best Bass Assassin Fishing Lures of 2026: Picks Compared.
Be realistic about the tradeoffs. Early lures often come out lopsided, paint chips, or hook-up rates lag behind commercial baits. Plan on a few rounds of adjustment before your creations catch fish consistently. If you are new to the topic overall, it helps to study how commercial designs are built first. For example, the Homemade Bass Fishing Lures: A Step-by-Step Guide for Beginners article on this site walks through the basics in more detail, and the Japanese Bass Fishing Lures: A Step-by-Step Guide for Beginners piece covers how slim, finesse-style profiles are constructed.
Step 1: Choose the Lure Type You Want to Build
Start with one lure type rather than trying to make everything at once. Three beginner-friendly options cover most bass situations: We also found Effective Lure Selection and Retrieval for Bass Fishing useful on this point.
- Football or flipping jigs: Lead head with a skirt, good for cover and bottom contact. Molding a lead head is a common first project.
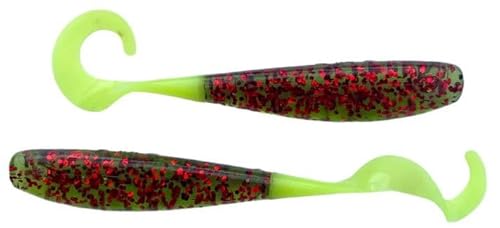
- Soft plastic worms and creature baits: Poured or cut from plastic, rigged weedless. These are versatile and forgiving to make.
- Topwater plugs: Wood or foam bodies with a paint scheme and hooks. Good for warm-weather surface action, though shaping and balancing take patience.
For a first project, jigs or soft plastics are usually the easiest because they require fewer specialized tools and cure or set quickly.
Step 2: Gather the Right Materials and Tools
Your materials list depends on the lure you choose. The checklist below covers a basic jig-and-plastic setup.
- Lure mold (silicone or aluminum) rated for the material you plan to pour
- Melting pot or ladle with thermostat control, or a bench-top melter
- Lead-free or tin-based alloy if you want to avoid lead exposure
- Plastisol or soft plastic pouring resin, with color dye and scent additives
- Hooks sized for your target weight (commonly 3/0 to 5/0 for jigs)
- Ventilation, heat-resistant gloves, safety glasses and a fire extinguisher
- Scale for measuring weights, and a sprue cutter or fine file for cleanup
Safety note: Molten metal and plastisol cause serious burns, and some metals and additives release fumes. Work outdoors or in a well-ventilated space, keep children and pets away, and consult a qualified professional or your local safety guidance before working with lead or unfamiliar chemicals.
Step 3: Pour or Form the Lure Body
Pouring a Lead Jig Head
Preheat the mold to reduce cold spots. Heat your alloy to the temperature the manufacturer specifies for your metal, then pour steadily into the mold. Let it cool completely before opening. Common target weights are 1/4 ounce, 3/8 ounce and 1/2 ounce, and weighing every few pours shows you how consistent your technique is.
Pouring Soft Plastics
Mix plastisol or resin with color and scent at the ratio given on the product label. Stir gently to avoid bubbles, pour into the mold, and allow the body to set. Remove the bait once it is firm enough to hold its shape, then let it finish curing fully before rigging.
Shaping Topwater Bodies
Cut wood or foam to rough shape, then refine the profile with sandpaper and files. Check symmetry by holding the body on its side and rotating it. Mount hooks and weigh the bait to ensure it floats at the angle you want.
Step 4: Balance, Paint and Finish
A lure that spins, tilts or runs crooked will not catch bass. Check each finished bait on a flat surface and in water. For jigs, make sure the hook point rides up or sits correctly relative to the head. For plugs, a simple float test in a sink or tub shows whether the nose and tail are balanced.
Use marine-grade or lure-specific paint, and apply thin coats. Let each coat dry before adding the next. Eyes, glitter, and clear topcoats can be added once the base color is set. Rushing this stage often leads to chipping on the first cast.
Step 5: Test and Tune on the Water
Once a lure is built, test it under conditions similar to where you plan to fish. Note how it sinks, how fast it falls, and whether the hook sets reliably. Adjust weight by a quarter ounce or a few grams at a time. Keep a log of what works in each body of water. Over several trips you will learn which colors, weights and profiles match your local bass.
Recommended gear
Good tools make the process less frustrating. Tackle-building supplies and a reliable melter are the two most useful additions for most beginners.
- Bench-top lead-free melting pot with thermostat: Holds steady temperature, which improves pour quality. View on Amazon
- Silicone jig and soft plastic molds: Flexible molds release cleanly and are easy to store. View on Amazon
- Plastisol soft plastic pouring kit with color and scent: Gives you a starting palette and aroma options. View on Amazon
Common mistakes
- Pouring into a cold mold, which causes surface pitting and weak spots.
- Mixing too many colors at once, leading to muddy results.
- Skipping the balance check and wondering why baits run crooked.
- Using hooks that are too light for the weight of the bait.
- Painting thick coats that chip and crack after a few casts.
- Testing only in the sink and never on the water, which hides action problems.
Tips for better results
- Keep detailed notes on temperature, weight and color for every batch.
- Make a small test batch before committing to a large run of materials.
- Pair homemade lures with the techniques in the Bass Fishing Lures for Early Spring: 7 Picks That Work Best (Step-by-Step) guide when conditions are cold and fish are slow.
- Study how commercial designs handle cover. The Clear Water Bass Fishing Lures: 7 Proven Picks and How to Use Them article is useful for understanding profile and color choices.
- Use bright, natural colors in clear water and darker or contrasting colors in stained water.
FAQ
Is it hard to make bass lures at home?
Basic jigs and soft plastics are beginner-friendly. Topwater plugs take more shaping and balancing skill and are usually better attempted after you have a few successful pours.
What is the best material for a first homemade lure?
Soft plastic is often the easiest starting point because it requires less heat and fewer specialized tools than lead casting, and it cures quickly.
Do homemade lures catch as many fish as store-bought ones?
They can, but results depend on profile, weight, action and color. Test them on the water and compare against commercial baits you already trust.
How do I keep molten lead safe to work with?
Work in a ventilated area, wear heat-resistant gloves and eye protection, and keep the workspace free of children and pets. Consider lead-free alloys, and consult a qualified professional or local guidance before working with lead.
Which hook size should I use for a bass jig?
Many anglers use 3/0 to 5/0 hooks for common jig weights, but match the hook to the bait’s size and weight and to the cover you plan to fish.
How long should I let soft plastics cure?
Follow the instructions on your plastisol or resin label. Most products need several hours to set fully, and rushing the process can cause tears or tackiness.
Can I use the same mold for different colors?
Yes, but clean the mold thoroughly between colors to avoid contamination, and let it cool and dry before switching dye.
Conclusion
Building your own diy fishing lures bass anglers can rely on comes down to picking one lure type, gathering the right materials, pouring carefully, and testing the results on the water. Start simple with jigs or soft plastics, track what works, and refine your designs over time. With steady practice, you can build a tackle supply that matches the bass in your local waters.
Related reading
- Z Man Fishing Lures: How to Choose and Fish Them for Bass
- X Zone Fishing Lures: How to Choose and Fish Them for Bass (2026)
- Voodoo Shrimp Fishing Lures: How to Rig and Fish Them for Bass
- Vintage Red and White Fishing Lures: 6 Best Picks for Bass and Pike
- Vintage Mouse Fishing Lures: 6 Best Picks for Bass and Pike in 2026
Ready to choose one?
About Ethan Brooks
Ethan Brooks is part of our editorial team and reviews and edits our freshwater fishing tackle on a budget guides, checking product details against manufacturer specifications and owner feedback.